Open Praat
- Download Praat:
- https://www.fon.hum.uva.nl/praat/
- This will download a zipped folder containing a praat.exe file. Save it somewhere where you can find it later, unzip it, and open praat.exe
Here’s a video tutorial from Matt Winn about downloading Praat: https://www.youtube.com/watch?v=QonCpMS5JPg
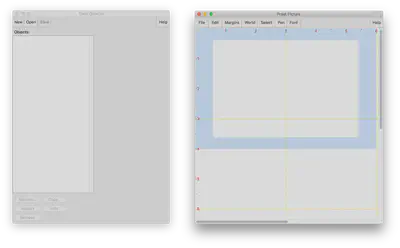
- When you open Praat, two windows pop up. One is called Praat Objects (or: object window), and the other is called Praat Picture. Praat Objects is the most important interface for working with sound and annotations, while Praat Picture is where the figures you draw appear (e.g., waveforms or spectrograms) allowing you to save them as .png or .eps files. In most cases, you can ignore Praat Picture and close it.
- In the Objects window, there are fixed menus at the top (Praat, New, Open, Save) and bottom (Rename, Copy, Inspect, Info, Remove). On the right is a dynamic menu, which changes depending on which objects are selected (Sounds, TextGrids, Spectra, etc.).
Why is it called Praat anyway?
Praat was created by Paul Boersma and David Weenink, two Dutch speech scientists from Amsterdam. The Dutch word ‘praat’ /pra:t/ is the imperative form of the verb ’to speak’ (so “speak!”).
Open a sound file
- Open a sound file: Open > Read from file…
- The file will show up as a Sound object in the object window, and upon opening will already automatically be selected (highlighted in blue)
- Note that Praat, like me, has a serious dislike for spaces in filenames. If your file is called “file number one.wav”, Praat will present it in the object window as “file_number_one”, replacing spaces with underscores. This will for instance affect the default name when saving the object in Praat. So here’s a free piece of advice: better avoid spaces in filenames…
- You can view the sound by clicking View & Edit
- This will show the sound waveform (oscillogram) on top and a spectrogram below that.

Zooming and playing
- You can zoom in to a different parts of the recording by clicking and dragging inside the waveform to select a part and click
[sel]or [CTRL+N] in the bottom left to zoom in to this part. You can also usebak[CTRL+B] to go back to the previous view,[all][CTRL+A] to view the entire sound file, and[in][CTRL+I] and[out][CTRL+O] to gradually zoom in and out. - You can play parts of the sound by selecting an interval and hitting [TAB] to play and [ESCAPE] to stop the playback. This is identical to clicking on the interval appearing in the first gray bar at the very bottom of the TextGrid window. Clicking on the second gray bar will play the visible window, while clicking on the third and last gray bar will play the entire sound.
- Now close the Sound window because we do not only want to view the sound, we also want to annotate it in a TextGrid.
Create a TextGrid
- Go back to the Praat object window, select the Sound by clicking on it (if it wasn’t selected already), and click Annotate > To TextGrid…
- Praat will then ask you for the names of tiers. Each TextGrid can have multiple tiers, combining for instance word-level annotations (longer intervals demarcating individual words), syllable-level annotations (shorter intervals demarcating the syllables inside the words), and phoneme-level annotations (short intervals demarcating the individual sounds).
- Tiers inside TextGrids come in two flavors: interval tiers and point tiers. Interval tiers allow you to add ‘boundaries’ that demarcate certain acoustic events (words, syllables, phonemes), indicating where they are and how long they are. For word-level annotations in an interval tier, you’d need two boundaries to demarcate a single word: one at its onset and another at its offset. Point tiers allow you to add ‘points’ that identify certain individual time points, but not the intervals between time points. Interval tiers are the most commonly used type of tier, so we’ll primarily focus on interval tiers.
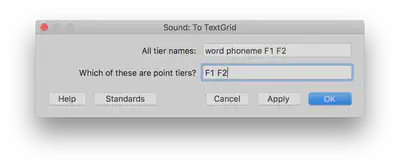
- Enter the names of your interval tiers in the top field, separated by space (e.g.,
word phoneme), and click OK. If you want any of these to be point tiers instead of interval tiers, copy the name of the point tier in the second field (e.g.,word phoneme F1 F2in the first field, definingF1 F2in the second field as point tiers).
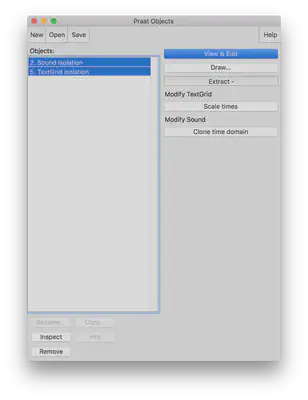
- You’ll find a new object appear in the object window, namely a(n empty) TextGrid object with the same name as the Sound object. Also, it is selected automatically (highlighted in blue).
- Select both the Sound object and the TextGrid object (clicking while holding [SHIFT] or [CTRL]) together, and click View and Edit
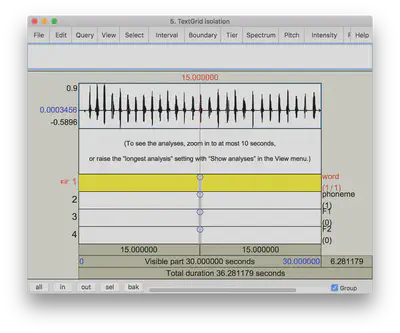
- You’ll see a new window, with the waveform on top, then a spectrogram, and then the various tiers of the TextGrid appearing below. You’ll find the names for the various tiers (that you defined in the previous step) appear on the right.
- Now you can start editing the TextGrid by adding ‘boundaries’ (in interval tiers) and ‘points’ (in point tiers). We’ll first focus on word-level annotations, identifying the onset and offset of individual words.
Segment words
- Select a time window in the waveform that contains your word of interest, and click
[sel][CTRL+N]. - It’s often wise to select a rather generous interval around a word of interest. This allows you to then select the ’true’ onset and offset of the word with greater precision and without missing anything.
- Now that you see the word in greater detail, we’ll segment it.
- Click inside the waveform at the word onset and drag to the word offset. This will select the word inside the waveform. Hit [CTRL+,] to move the left boundary of the selection to a zero-crossing, [CTRL+.] to move the right boundary of the selection to a zero-crossing, and then [ENTER] to create an interval in the top tier of the TextGrid (top tier selected by default).
- Instead of adding an entire interval (i.e, two boundaries) in one go, you can also click on an individual time point in the waveform, hit [CTRL+0] to move to the nearest zero-crossing, and then hit [ENTER] to insert a single boundary.
- You can still adjust the boundaries by dragging them around with the mouse. However, there’s no keyboard shortcut to move a pre-existing boundary to a zero-crossing: you’ll have to do this manually by selecting it and going to Boundary > Move to nearest zero crossing. Consequently, it’s often easier to simply remove a boundary [ALT + BACKSPACE], click at the new location, hit [CTRL+0] and [ENTER] to place the new boundary.
Always select time points at positive-going zero-crossings! This is particularly important when you want to extract intervals from a sound file and manipulate them (but less important if you only want to measure certain acoustic features, such as intensity or F0, without extracting/manipulating anything).
Why should I?
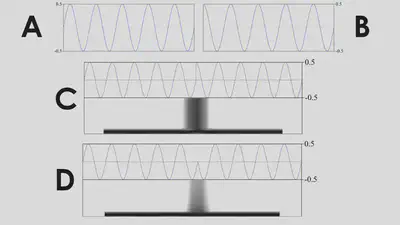
Sound is a wave of air pressure. Imagine we have two pure tones of 440 Hz, but one starts at a positive-going zero-crossing (phase = 0°; signal A) and the other at a point of high air pressure (phase = 1/2π; signal B). If we then concatenate these two sounds (signal C), and play the concatenation (see below figure), our speakers need to jump from 0 to 1 near instantaneously. This will result in an audible click. NOTE: concatenating two tones that both start at a zero-crossing, but one starts at a positive-going zero-crossing and the other at a negative-going zero-crossing, also results in audible artifacts (signal D). Therefore, it’s advisable to consistently select time points at positive-going zero-crossings. If you want to manually inspect this, select a tiny time interval around a boundary in Praat and click [sel] [CTRL+N].
This is signal C, can you hear a ‘click’ midway in the recording?
This is signal D, can you again hear a ‘click’ midway in the recording?
Segment phonemes
- The two boundaries you just added demarcate the word, but they also form the onset of the first phoneme, and the offset of the last phoneme inside the word. Extend the first boundary in the first word tier to the second phoneme tier by clicking on it (blue line turns red) and then click the small circle appearing just below it (inside the second tier). This will place a boundary in the second tier at the exact same time point as in the first tier.
- Now place additional individual boundaries at the onsets and offsets of the various phonemes inside the word in the second phoneme tier. First click anywhere on the second tier to select it, then click on a time point in the waveform, and hit [ENTER] to place a boundary.
- You can play intervals to verify if they are accurate. Click on an interval to select it and hit [TAB] to play it and [ESCAPE] to stop the playback. This is identical to clicking on the interval appearing in the first gray bar at the very bottom of the TextGrid window. Clicking on the second gray bar will play the visible window, while clicking on the third and last gray bar will play the entire sound.
- Now let’s label the individual intervals. Click on an interval and simply type in a label. It will appear inside the interval. You can also edit it in the utmost top left of the TextGrid window.
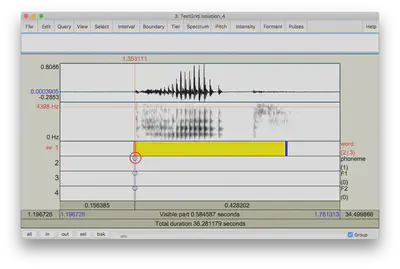
- The final result could then look something like this:

Working with TextGrids
- You can quickly scroll through TextGrids by clicking on an interval and then hitting [ALT + →] to see the next one, or [ALT + ←] to see the previous one. Similarly, use [ALT + ↓] and [ALT + ↑] to go up or down a tier.
- You can easily remove boundaries by selecting an interval and hitting [ALT + BACKSPACE]. This will remove the left boundary of the interval.
- If you want to remove multiple boundaries in a row, you hit [ALT + BACKSPACE], [ALT + →], [ALT + BACKSPACE], [ALT + →], etc.
Saving the TextGrid
- Save frequently! If Praat crashes, you will lose all your recent work unless you save regularly.
- Option 1: Save from the TextGrid Editor window. Just hit [Ctrl+S] which will bring up a dialogue window that allows you to specify the name and location of the new .TextGrid file. NOTE: Even though you see the waveform in the TextGrid Editor window, saving in this way only saves the TextGrid (i.e., everything in the tiers), not the Sound!
- Option 2: Save from the Praat object window. Select the TextGrid object (highlighting it in blue) and go to Save > Save as text file. This will bring up the same dialogue window. Do not select both the Sound and TextGrid objects; you only want to save your annotations inside the tiers in the TextGrid.
Let’s automate this
Praat has a scripting interface that allows you to enter code to perform certain functions in a much faster and more efficient way. See our How to script in Praat to get you acquainted with the Praat scripting interface.
Once you’re familiar with Praat scripting, check out our annotation script. This script reads all files in a given folder, presents them to the user for manual annotation, and when the user clicks Next to proceed Praat will automatically save the user’s annotations and present the next file for annotation. This speeds up an annotation workflow considerably.
Happy Praat’ing!